


01 Mar 2019
Help! My baseline bars are in the wrong place!


There is more to showing THE Critical Path in Primavera than your project manager can imagine. Primavera allows you to change certain settings to define the criticality of activities: you can define a threshold value for total float, or choose for the longest path instead of a total float-based critical path.
It is likely that you are interested in all activities that drive a certain milestone. And it makes much more sense to monitor the longest path towards this milestone instead of the critical path defined by total float. This very useful option is however a little bit hidden in Primavera P6 and I desperately want to share it with you! It is a method I use on every single project.
Standard settings in Primavera P6 define critical activities as activities with “Total Float less than or equal to 0” (ref. red rectangle in picture below). One can choose to change this “0” to any positive or negative value according to the analysis in mind.
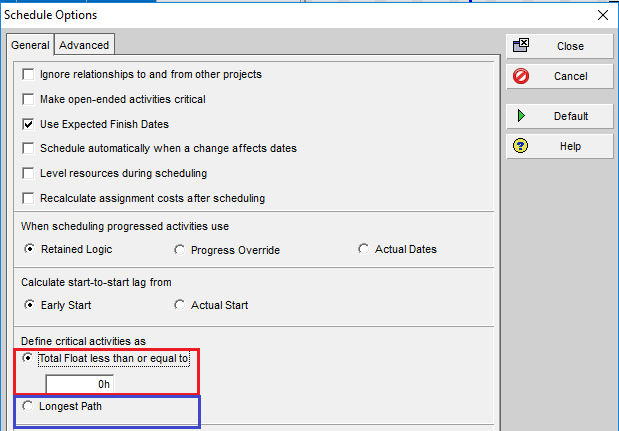
A second option is to choose for the ‘Longest Path’ option to define activities’ criticality. In this case, activities will be critical if they are part of the path of driving relationships towards the activity or activities with an early finish date which is the same as the calculated early finish date of the project (ref. blue rectangle in picture above). In many cases, the longest path option allows for a more useful analysis since it better deals with multiple calendars and constraints. However, this basic feature only offers the possibility to show the path towards the ‘last’ activity or activities of the project.
Would it not be a great idea to use this longest path method towards ANY activity? Well fortunately, it is possible and can be done in just a few steps:
Step 1:
Go to the ‘Advanced’-tab in Schedule Options and apply settings as per the red rectangles in the screenshot below. You can ignore ‘Specify the number of paths to calculate’.

Step 2:
Choose the activity for which you want to analyse the longest path (ref. blue rectangle in the screenshot above).
Step 3:
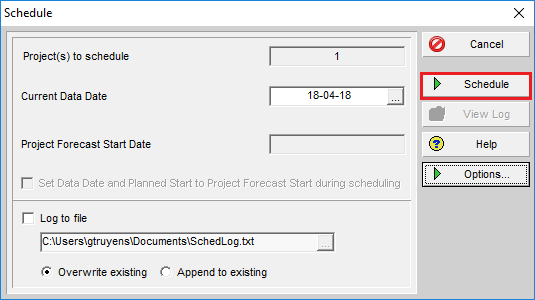
Click ‘Close’ and then ‘Schedule’ (ref. screenshot below)
Step 4:
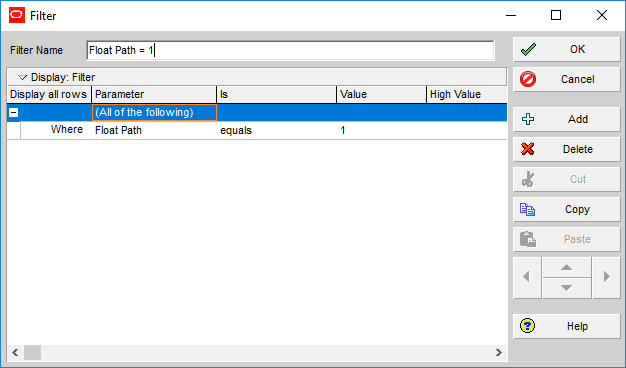
Create and apply a filter named ‘Float Path = 1’ as per illustration below:
And that is it! Primavera P6 will only show you now the longest path towards the activity of your choice!
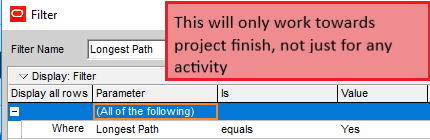
Note: you cannot use the built-in filter ‘Longest Path’ or the built-in attribute ‘Longest Path’ to create your own filter as this will only work for the longest path towards project finish (ref. picture below)
You can’t find what I’ve promised? The bullet points below will most probably provide the explanation:
One of the benefits of using total float to define criticality, is that you have a metric to also monitor activities which are near-critical. The most important activities to monitor are the ones with no float, but of course you want to keep an eye on activities with very limited total float as well.
Analogue to this and related to the longest path method, we can refer to sub-critical float paths that can be displayed as well. To depict the float paths that are less critical, you can use the option ‘Specify the number of paths to calculate’ which I told you to ignore under ‘Step 1’. For more details regarding this matter, you’ll have to come back to this website for a future blogpost.
It is surprising that in Primavera P6, you need somewhat of a workaround for a very useful method as described above. The vast majority of project planners will merely submit a list of activities with no (or limited) total float when asked to perform a critical path analysis (by using the standard functionality of Primavera P6). In many situations, this won’t provide sufficient insights to the project management team and / or the project owner to fully understand the schedule’s criticality and adequately steer the project’s execution. The longest path method, and some extra clicks as described in this blogpost, will add a great deal of clarity to accomplish the desired project goals.