
19 Jul 2018
Scheduling progressed activities


Primavera P6 is the leading tool for scheduling and controlling large projects. Setting up an initial baseline schedule in P6 is a popular topic, but the monitoring and control phase is equally important, if not more so.
Once your qualitative project baseline is set up, approved and your project has started, the next step is to closely monitor and track the progress of the project. When this is your first time updating a schedule in Primavera P6, this can become quite challenging. There are different crucial settings and pitfalls to be addressed during the updating process.
The procedure for progress updates we use as experts is not by applying the “Update Progress” or “Apply Actuals” functions in P6. These functionalities strongly reduce the control on the schedule.
In the following 7 steps we will guide you through the advised method to add progress to your schedule.
In order to track your schedule performance, a baseline is essential as a reference for your project. It would be good practice to safe the current schedule as a baseline before making any changes. When assigning the baseline, you can choose between 2 types:
Project Baseline: This baseline is the official approved project schedule as agreed with the client. The project baseline is a fixed programme that can only be changed through change control. No progress should be contained in this type of schedule.
User Baseline: These are the unofficial baselines that the user can create to measure the performance as the project progresses. Often these are time snapshots of the project, for instance a previous progress update.
Once assigned, the properties of the baselines can be visualized as activity columns and as Gantt chart bars together with the current schedule. This will greatly improve your insight in the schedule performance during and after updating.

There are a few things that can go wrong when assigning a baseline in P6. Some special attention is needed for the following points:
Next, progress is collected and entered in the tool. Here, a well-documented input data sheet is the key to success. Collect all the necessary information of the planned activities up to the Cut-Off Date and Hour. Is your progress up to and including Friday? Then your Data Date should be on the Saturday on 00:00.
There are 2 useful tools to visualize the activities that are currently scheduled in the period leading up to the Cut-Off Date:
The required input for these activities will depend on the activity status as depicted in the table below:

Some aspects to consider when collecting the progress input for an update in P6:
The progress from the previous step can now be implemented directly in P6 in the same order as the previous table:
At this point your schedule might not look correct; durations and dates don’t seem in line with the input, relationships are not respected, etc…. Don’t worry, this is normal at this stage. Don’t let this freak you out by scheduling too early.
Some aspects to consider while entering the progress in P6:
Once we have entered all our input, it’s time to press F9 and fill in the new Data Date I.e., the Cut-Off Date. Primavera will reschedule activities after the Data Date based on the Critical Path Method. Before we sit back and relax, carefully check the scheduling options in the schedule window.
A specific scheduling option related to projects in progress, is how P6 should deal with out-of-sequence activities. For out-of-sequence activities you can choose to ‘retain logic’, ‘progress override’ or use ‘actual dates’. In our blogpost "Scheduling progressed activities" we go more into detail about the effect of this function on your schedule.

Activities that are out-of-sequence are reported in the scheduling log file. This file also warns for progress irregularities like activities with actual dates later than the Data Date.
Make sure to check the scheduled programme thoroughly before proceeding. Verify if the schedule is in line with the input from your data sheet. Make changes if necessary and reschedule.
After this technical check, also perform a sanity check. Are the performed activities making sense and is the impact on the future schedule realistic? Big impacts on the schedule should be explainable.
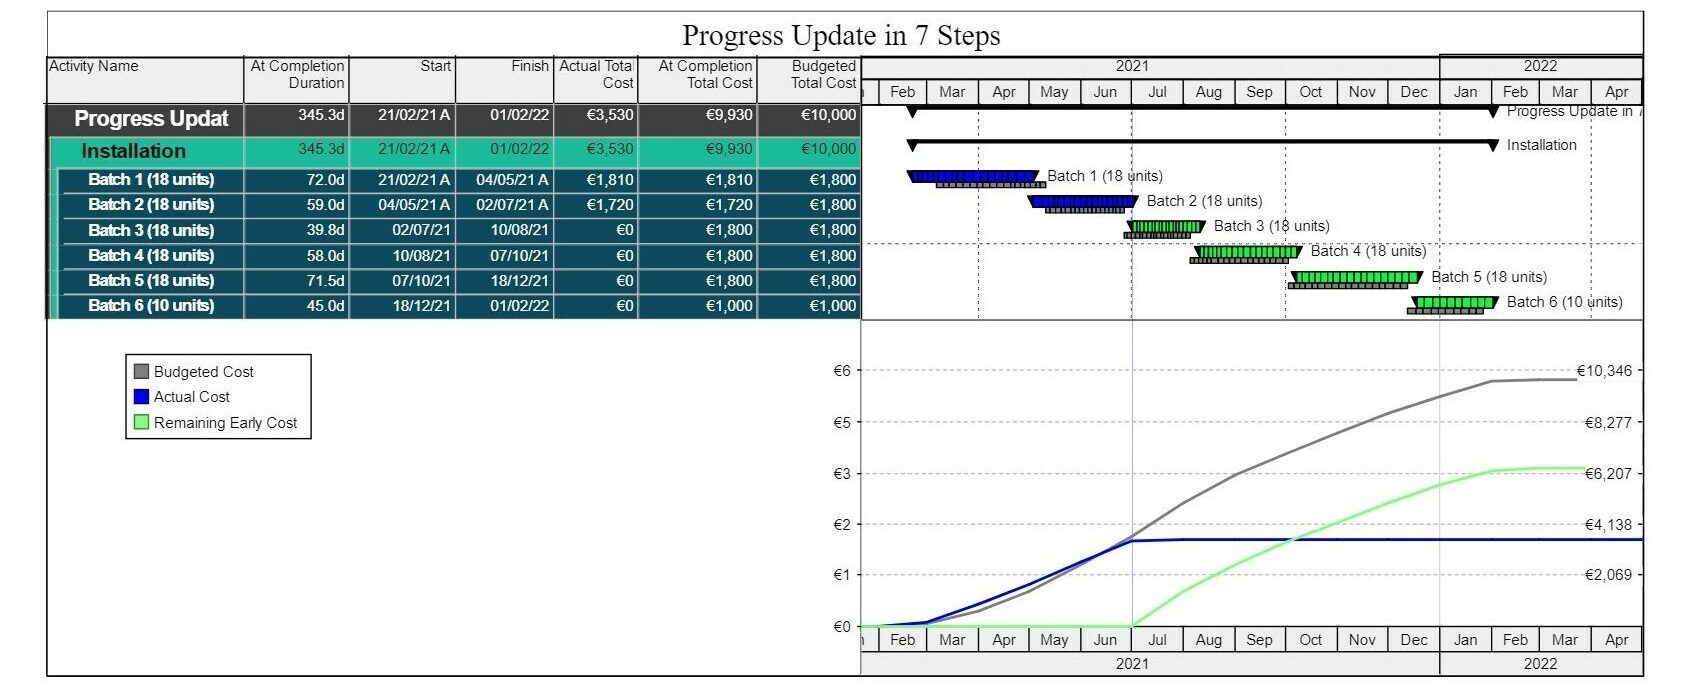
Now that all this progress is implemented and processed by the schedule, the data needs to be visualised in useful layouts that facilitates the analysis of the schedule. Output created from the schedules should enable the project manager to have a clear view of the project performance and identify possible planning issues that need some attention.
The possibilities for creating useful progress layouts in P6 are endless. Let’s go through some examples:
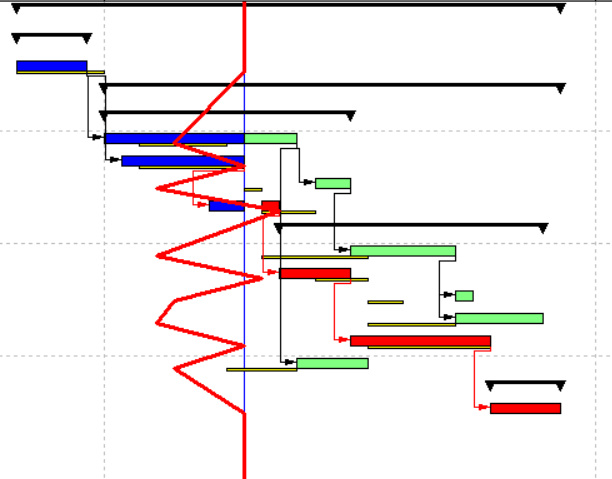
Tip: P6 has a Progress Line function that visualises which activities are behind schedule (left of Data Date line) and the activities ahead of schedule (right of Data Date line).
After monitoring, we need to control by analysing and influencing our project. To properly control our project, we need to be critical and learn from our analysis. What are the reasons activities are taking longer? What and how are activities underperforming? Why are activities becoming critical? Use this knowledge to get a better understanding and to have better estimations of the future. By re-evaluating the future schedule based on the gained knowledge during the execution, possible problems can be identified and mitigated at an early stage.
After you successfully completed these 7 steps, your progress update reflects the actual works and forecasts the future works. Based on this progress update, possible issues can be identified and form the basis of a mitigation plan. This schedule change analysis is part of the control phase where the schedule is reassessed and optimised. These mitigation actions will lead to changes in the schedule such as adjustments in resources, logic links, activities, … etc. This procedure is called “half-step scheduling” and can be seen as a non-progress revision based on knowledge gained from the progress reporting.

Primavera P6 is the market leader in the project control industry to schedule and control large projects. How to setup an initial baseline schedule in P6 during the scheduling phase is a hot topic. The monitoring & control phase appears to be a less popular subject however equally, if not even more, important.


